用 antd 做个人博客卡到前端了,迫不得已来学 react,也是干上全栈了– –学自尚硅谷张天禹 react
React 就是 js 框架,可以理解为对 js 做了封装,那么封装后的肯定用起来更方便。
相关 JS 库
- react.js:React 核心库。
- react-dom.js:提供操作 DOM 的 react 扩展库。
- babel.min.js:解析 JSX 语法代码转为 JS 代码的库。
浏览器不能直接解析 JSX 代码, 需要 babel 转译为纯 JS 的代码才能运行。只要用了 JSX,都要加上 type=“text/babel”, 声明需要 babel 来处理。
JS 库示例 :
 1
 2
 3
 4
 5
 6
 7
 8
 9
10
11
12
13
14
15
16
17
18
19
20
21
22
23
24
25
26
27
28
29
|
<!DOCTYPE html>
<html lang="en">
<head>
	<meta charset="UTF-8">
	<title>1_使用jsx创建虚拟DOM</title>
</head>
<body>
	<!-- 准备好一个"容器" -->
	<div id="test"></div>

	<!-- 引入react核心库 -->
	<script type="text/javascript" src="../js/react.development.js"></script>
	<!-- 引入react-dom,用于支持react操作DOM -->
	<script type="text/javascript" src="../js/react-dom.development.js"></script>
	<!-- 引入babel,用于将jsx转为js -->
	<script type="text/javascript" src="../js/babel.min.js"></script>

	<script type="text/babel" > /* 此处一定要写babel */
		//1.创建虚拟DOM
		const VDOM = (  /* 此处一定不要写引号,因为不是字符串 */
			<h1 id="title">
				<span>Hello,React</span>
			</h1>
		)
		//2.渲染虚拟DOM到页面
		ReactDOM.render(VDOM,document.getElementById('test'))
	</script>
</body>
</html>
|
浏览器控制台可能会报如下错误:
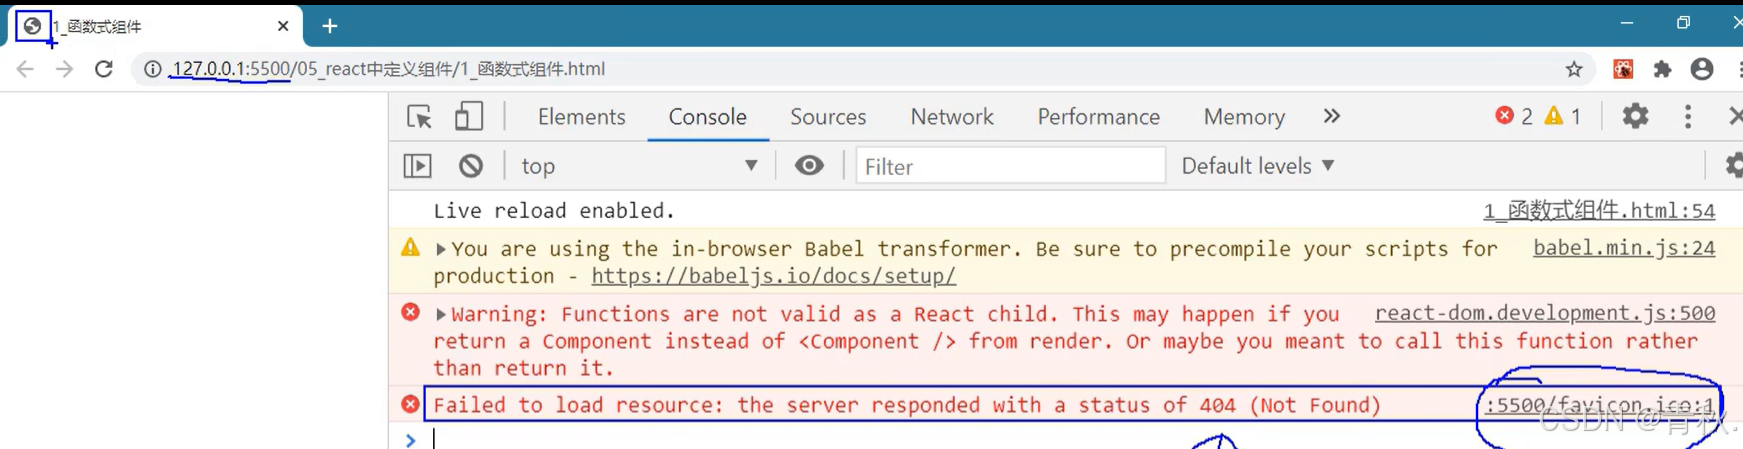
找不到 favicon.ico 的资源,那么左上角的标签页就不显示图标。解决方法是在项目中根目录下放一个同名图标即可。
真实 DOM 和虚拟 DOM
React 提供了一些 API 来创建虚拟 DOM 对象
虚拟 dom 定义在<script type=“text/babel”> </script>中!!!
 1
 2
 3
 4
 5
 6
 7
 8
 9
10
|
//创建虚拟dom
1.用React创建,语法:React.createElement('标签名',{标签属性},'标签内容')
const VDOM = React.createElement('Good',{id:'title'},'Hello JSX')

2.用JSX语法创建,可以看到这样创建dom更简单
const VDOM = <Good id="title">Hello JSX</Good>


//创建真实dom,不常用
const DOM = document.createElement()
|
- 我们编码时基本只需要操作 react 的虚拟 DOM 相关数据, react 会转换为真实 DOM 变化而更新界。
- 虚拟 DOM 对象最终都会被 React 转换为真实的 DOM。
- 虚拟 dom 本质是一个 Object(控制台输出 VDOM instanceof Object 的结果为 true)。
- 虚拟 dom 内部元素少,真实 dom 内部元素多,因为虚拟 dom 是 react 内用,无需真实 dom 那么多属性。
注意!创建的虚拟 dom 只能有一个根标签,并且内部的标签必须闭合(有 /> 结束),如:
 1
 2
 3
 4
 5
 6
 7
 8
 9
10
11
12
13
14
15
16
17
18
19
20
21
22
23
24
25
26
|
//正确的创建虚拟DOM,根标签只有一个
const VDOM = (
	<div>
		<h2>青秋</h2>
	</div>
)

//错误的创建虚拟DOM,根标签有俩div
const VDOM = (
	<div>
		<h2>青秋</h2>
	</div>
    <div>
		<h2>青秋</h2>
	</div>
)

//必须有/>结束
const VDOM = (
	<div>
		<h2>青秋</h2>
    //<input type="text" > 错误,没有闭合
    <input type="text"/> 或 <input type="text"/> </input>
	</div>

)
|
JSX 语法规则
全称是 JavaScript XML,是 react 定义的一种类似于 XML 的 JS 扩展语法,可以把 js 和 html 写在一起,类似 JSP。
JS + XML 本质是React.createElement ( component , props , … children **)**方法的语法糖
-
作用: 用来简化创建虚拟 DOM
-
写法:var VDOM = <h1> Hello JSX</h1>
-
注意:这样创建的<h1>不是字符串, 也不是 HTML/XML 标签,它最终产生的就是一个 JS 对象
-
标签名和标签属性任意,可以是 HTML 标签属性或其它
-
语法规则:
-
遇到 < 开头的代码, 以标签的语法解析: 与 html 同名标签则转换为 html 同名元素 , 其它标签需要特别解析,如:
1
2
3
4
5
|
//自定义的h1会被替换成html中同名的标签<h1>
const vdom1 = <h1>hello</h1>;

//自定义的Good在html中不存在同名标签,浏览器控制台会报错
const vdom2 = <good>hello</good>;
|
 也就是说,定义的虚拟 dom 中,开头小写的标签会去 html 中寻找同名的元素并替换,找不到就会报上面的错误。如果是开头大写的标签,那么就是自定义的组件 ,如果写成 Good,那么浏览器就会去渲染 Good 组件,因此 Good 组件需要提前定义,否则会 undefined。
虚拟 DOM 中使用内联样式
在虚拟 dom 中使用内联样式(直接在标签中写 style),需要用{{ }}包裹,其中外层的{ }代表标签里要写 js 表达式,内层的{ }代表要写的是一个对象。
另外{{ }}的 style 属性名是小驼峰的形式,比如 font-size 写成 fontSize。真实 dom 的类名是 class,**虚拟 dom 的类名是 className。**如:
 1
 2
 3
 4
 5
 6
 7
 8
 9
10
11
|
//真实dom内联样式
<div class='dom'>
<h2 style='color: black;font-size: large;'>青秋博客</h2>
</div>;
//虚拟DOM内联样式
const VDOM = (
<div className='vdom'>
<h2 style={{ color: 'white', fontSize: '29px' }}>青秋博客</h2>
</div>
);
|
render 渲染虚拟 DOM
语法: ReactDOM . render (<MyComponent/>,document.getElementById(’test’))
作用: 将定义的虚拟 DOM 元素渲染到页面中的真实 DOM 中显示。
参数说明:MyComponent**是创建的虚拟 dom 对象;**document.getElementById(’test’)是根据 id 获取的真实 dom 容器,是用来用来包含虚拟 dom 的。
函数式组件和类式组件
简单组件
组件名必须首字母大写!!小写则会去 html 中寻找同名元素
 1
 2
 3
 4
 5
 6
 7
 8
 9
10
11
12
13
14
|
<script type="text/babel">
//1.创建函数式组件
function MyComponent(){
console.log(this); //此处的this是undefined,因为babel编译后开启了严格模式
return <h2>我是用函数定义的组件(适用于【简单组件】的定义)</h2>
}
//2.渲染组件到页面
ReactDOM.render(<MyComponent/>,document.getElementById('test'))
/*
执行了ReactDOM.render(<MyComponent/>.......之后,发生了什么?
1.React解析组件标签,找到了MyComponent组件。
2.发现组件是使用函数定义的,随后调用该函数,将返回的虚拟DOM转为真实DOM,随后呈现在页面中。
*/
</script>
|
复杂组件
 1
 2
 3
 4
 5
 6
 7
 8
 9
10
11
12
13
14
15
16
17
18
19
|
<script type="text/babel">
//1.创建类式组件
class MyComponent extends React.Component {
render(){
//render是放在哪里的?------ MyComponent的原型对象上,供实例使用。
//render中的this是谁?------ MyComponent的实例对象 <=> MyComponent组件实例对象。
console.log('render中的this:',this);
return <h2>我是用类定义的组件(适用于【复杂组件】的定义)</h2>
}
}
//2.渲染组件到页面
ReactDOM.render(<MyComponent/>,document.getElementById('test'))
/*
执行了ReactDOM.render(<MyComponent/>.......之后,发生了什么?
1.React解析组件标签,找到了MyComponent组件。
2.发现组件是使用类定义的,随后new出来该类的实例,并通过该实例调用到原型上的render方法。
3.将render返回的虚拟DOM转为真实DOM,随后呈现在页面中。
*/
</script>
|
State 状态
类的基本知识
 1
 2
 3
 4
 5
 6
 7
 8
 9
10
11
12
13
14
15
16
17
18
19
20
21
22
23
24
25
26
27
28
29
30
31
32
33
34
35
36
37
38
39
40
41
42
43
44
45
46
47
48
49
50
51
52
53
54
55
56
57
58
59
60
61
62
63
64
65
66
|
<!DOCTYPE html>
<html lang="en">
<head>
<meta charset="UTF-8">
<title>1_类的基本知识</title>
</head>
<body>
<script type="text/javascript" >
/*
总结:
1.类中的构造器不是必须要写的,要对实例进行一些初始化的操作,如添加指定属性时才写。
2.如果A类继承了B类,且A类中写了构造器,那么A类构造器中的super是必须要调用的。
3.类中所定义的方法,都放在了类的原型对象上,供实例去使用。
*/
//创建一个Person类
class Person {
//构造器方法
constructor(name,age){
//构造器中的this是谁?------ 类的实例对象
this.name = name
this.age = age
}
//一般方法
speak(){
//speak方法放在了哪里?------类的原型对象上,供实例使用
//通过Person实例调用speak时,speak中的this就是Person实例
console.log(`我叫${this.name},我年龄是${this.age}`);
}
}
//创建一个Student类,继承于Person类
class Student extends Person {
constructor(name,age,grade){
super(name,age)
this.grade = grade
this.school = '门头沟大学'
}
//重写从父类继承过来的方法
speak(){
console.log(`我叫${this.name},我年龄是${this.age},我读的是${this.grade}年级`);
this.study()
}
study(){
//study方法放在了哪里?------类的原型对象上,供实例使用
//通过Student实例调用study时,study中的this就是Student实例
console.log('我很努力的学习');
}
}
class Car {
constructor(name,price){
this.name = name
this.price = price
// this.wheel = 4
}
//类中可以直接写赋值语句,如下代码的含义是:给Car的实例对象添加一个属性,名为a,值为1
a = 1
wheel = 4
static demo = 100
}
const c1 = new Car('奔驰c63',199)
console.log(c1);
console.log(Car.demo);
</script>
</body>
</html>
|
- 状态即数据,状态变化会驱动视图变化,可以简单理解为存储数据的对象。
- 复杂组件即类定义组件有 this,那么就有 state,可以理解为一个对象的属性,可以通过 constructor()传递参数,而简单组件的 this 是 undefined 就没有 state 一说。
- render 方法中的 this 就是组件实例对象
- 组件自定义的方法中 this 为 undefined,如何解决?
- 强制绑定 this,通过函数对象的 bind() 2.箭头函数
注意!!状态必须通过 setState 进行更新,不能直接更改。
正确的:this.setState({isHot:!isHot})
错误的:this.state.isHot = !isHot
state 复杂写法
1
2
3
4
5
6
7
8
9
10
11
12
13
14
15
16
17
18
19
20
21
22
23
24
25
26
27
28
29
30
31
32
33
34
35
36
37
38
39
40
41
42
43
44
45
46
|
<script type="text/babel">
//1.创建组件
class Weather extends React.Component{
//构造器调用几次? ------------ 1次
constructor(props){
console.log('constructor');
super(props)
//初始化状态
this.state = {isHot:false,wind:'微风'}
//changeWeather是自定义的,要解决changeWeather中this指向问题
//调用bind方法会生成一个新函数,然后把新函数绑定到this实例对象上并命名为change,那么this实例对象有了名为change的方法
this.change = this.changeWeather.bind(this)
}
//changeWeather调用几次? ------------ 点几次调几次
changeWeather(){
//changeWeather放在哪里? ------------ Weather的原型对象上,供实例使用
//由于changeWeather是作为onClick的回调,所以不是通过实例调用的,是直接调用
//类中的方法默认开启了局部的严格模式,所以changeWeather中的this为undefined
console.log('changeWeather');
//获取原来的isHot值
const isHot = this.state.isHot
//严重注意:状态必须通过setState进行更新,且更新是一种合并,不是替换。
this.setState({isHot:!isHot})
console.log(this);
//严重注意:状态(state)不可直接更改,下面这行就是直接更改!!!
//this.state.isHot = !isHot //这是错误的写法
}
//render调用几次? ------------ 1+n次 1是初始化的那次 n是状态更新的次数
render(){
console.log('render');
//读取状态
const {isHot,wind} = this.state
//render函数中调用该类的另一个函数changeWeather,需要用this调用,否则会找不到要调用的函数!!
return <h1 onClick={this.change}>今天天气很{isHot ? '炎热' : '凉爽'},{wind}</h1>
}
}
//2.渲染组件到页面
ReactDOM.render(<Weather/>,document.getElementById('test'))
</script>
|
state 简单写法
1
2
3
4
5
6
7
8
9
10
11
12
13
14
15
16
17
18
19
20
21
|
<script type="text/babel">
//1.创建组件
class Weather extends React.Component{
//初始化状态
state = {isHot:false,wind:'微风'}
//自定义方法------------要用赋值语句的形式+箭头函数
changeWeather = ()=>{
const isHot = this.state.isHot
this.setState({isHot:!isHot})
}
render(){
const {isHot,wind} = this.state
return <h1 onClick={this.changeWeather}>今天天气很{isHot ? '炎热' : '凉爽'},{wind}</h1>
}
}
//2.渲染组件到页面
ReactDOM.render(<Weather/>,document.getElementById('test'))
</script>
|
Props
props 用于父组件向子组件传递数据,props 只读无法修改()
基本使用
1
2
3
4
5
6
7
8
9
10
11
12
13
14
15
16
17
18
19
20
|
<script type="text/babel">
//创建组件
class Person extends React.Component{
render(){
const {name,age,sex} = this.props
return (
<ul>
<li>姓名:{name}</li>
<li>性别:{sex}</li>
<li>年龄:{age+1}</li
</ul>
)
}
}
//渲染组件到页面
ReactDOM.render(<Person name="jerry" age={19} sex="男"/>,document.getElementById('test1'))
const p = {name:'老刘',age:18,sex:'女'}
ReactDOM.render(<Person {...p}/>,document.getElementById('test3'))
</script>
|
类型限制
1
2
3
4
5
6
7
8
9
10
11
12
13
14
15
16
17
18
19
20
21
22
23
24
25
26
27
28
29
30
31
32
33
34
35
36
37
38
39
|
<script type="text/javascript" src="../js/prop-types.js"></script>
<script type="text/babel">
//创建组件
class Person extends React.Component{
render(){
const {name,age,sex} = this.props
//props是只读的
//this.props.name = 'jack' //此行代码会报错,因为props是只读的
return (
<ul>
<li>姓名:{name}</li>
<li>性别:{sex}</li>
<li>年龄:{age+1}</li>
</ul>
)
}
}
//对标签属性进行类型、必要性的限制
Person.propTypes = {
name:PropTypes.string.isRequired, //限制name必传,且为字符串
sex:PropTypes.string,//限制sex为字符串
age:PropTypes.number,//限制age为数值
speak:PropTypes.func,//限制speak为函数
}
//指定默认标签属性值
Person.defaultProps = {
sex:'男',//sex默认值为男
age:18 //age默认值为18
}
//渲染组件到页面
function speak(){console.log('我说话了');}
ReactDOM.render(<Person name={100} speak={speak}/>,document.getElementById('test1'))
const p = {name:'老刘',age:18,sex:'女'}
ReactDOM.render(<Person {...p}/>,document.getElementById('test3'))
</script>
|
订阅-发布 PubSub
订阅发布用于兄弟组件传递数据,在之前,一个父亲有两个儿子,两个儿子要通信,要借助父亲来传达消息,而现在使用发布订阅,不需要借助父亲,两个儿子可以直接通信。
如 List 和 Search 两个兄弟组件
 1
 2
 3
 4
 5
 6
 7
 8
 9
10
11
12
13
14
15
16
17
18
19
20
21
22
23
24
25
26
27
28
29
30
31
32
33
34
35
36
37
38
39
40
41
42
43
44
45
46
47
48
49
50
51
52
53
54
55
56
57
58
59
60
61
62
63
64
65
66
67
68
69
70
71
72
73
74
75
76
77
78
79
80
|
import React, { Component } from 'react'
import PubSub from 'pubsub-js'
export default class List extends Component {
state = { //初始化状态
users:[], //users初始值为数组
isFirst:true, //是否为第一次打开页面
isLoading:false,//标识是否处于加载中
err:'',//存储请求相关的错误信息
}
componentDidMount(){
this.token = PubSub.subscribe('atguigu',(_,stateObj)=>{
this.setState(stateObj)
})
}
componentWillUnmount(){
PubSub.unsubscribe(this.token)
}
render() {
const {users,isFirst,isLoading,err} = this.state
return (
<div className="row">
{
isFirst ? <h2>欢迎使用,输入关键字,随后点击搜索</h2> :
isLoading ? <h2>Loading......</h2> :
err ? <h2 style={{color:'red'}}>{err}</h2> :
users.map((userObj)=>{
return (
<div key={userObj.id} className="card">
<a rel="noreferrer" href={userObj.html_url} target="_blank">
<img alt="head_portrait" src={userObj.avatar_url} style={{width:'100px'}}/>
</a>
<p className="card-text">{userObj.login}</p>
</div>
)
})
}
</div>
)
}
}
export default class Search extends Component {
search = ()=>{
//获取用户的输入(连续解构赋值+重命名)
const {keyWordElement:{value:keyWord}} = this
//发送请求前通知List更新状态
PubSub.publish('atguigu',{isFirst:false,isLoading:true})
//发送网络请求
axios.get(`/api1/search/users?q=${keyWord}`).then(
response => {
//请求成功后通知List更新状态
PubSub.publish('atguigu',{isLoading:false,users:response.data.items})
},
error => {
//请求失败后通知App更新状态
PubSub.publish('atguigu',{isLoading:false,err:error.message})
}
)
}
render() {
return (
<section className="jumbotron">
<h3 className="jumbotron-heading">搜索github用户</h3>
<div>
<input ref={c => this.keyWordElement = c} type="text" placeholder="输入关键词点击搜索"/>
<button onClick={this.search}>搜索</button>
</div>
</section>
)
}
}
|
Ref
为自定义的标签打标识
字符串形式的 ref
string 形式的 ref 存在效率问题,不推荐使用
1
2
3
4
5
6
7
8
9
10
11
12
13
14
15
16
17
18
19
20
21
22
23
24
25
26
27
|
<script type="text/babel">
//创建组件
class Demo extends React.Component{
//展示左侧输入框的数据
showData = ()=>{
const {input1} = this.refs
alert(input1.value)
}
//展示右侧输入框的数据
showData2 = ()=>{
const {input2} = this.refs
alert(input2.value)
}
render(){
return(
<div>
//ref相当于属性id,即标识了一个名为input1的input标签
<input ref="input1" type="text" placeholder="点击按钮提示数据"/>
<button onClick={this.showData}>点我提示左侧的数据</button>
<input ref="input2" onBlur={this.showData2} type="text" placeholder="失去焦点提示数据"/>
</div>
)
}
}
//渲染组件到页面
ReactDOM.render(<Demo a="1" b="2"/>,document.getElementById('test'))
</script>
|
回调函数的 ref
1
2
3
4
5
6
7
8
9
10
11
12
13
14
15
16
17
18
19
20
21
22
23
24
25
26
27
|
<script type="text/babel">
//创建组件
class Demo extends React.Component{
//展示左侧输入框的数据
showData = ()=>{
const {input1} = this
alert(input1.value)
}
//展示右侧输入框的数据
showData2 = ()=>{
const {input2} = this
alert(input2.value)
}
render(){
return(
<div>
//input的ref为c,把c赋给this实例对象,即把c标识的这个input标签赋给this对象,同时把input标签命名为myinput
<input ref={c => this.myinput = c } type="text" placeholder="点击按钮提示数据"/>
<button onClick={this.showData}>点我提示左侧的数据</button>
<input onBlur={this.showData2} ref={c => this.input2 = c } type="text" placeholder="失去焦点提示数据"/>
</div>
)
}
}
//渲染组件到页面
ReactDOM.render(<Demo a="1" b="2"/>,document.getElementById('test'))
</script>
|
createRef()
1
2
3
4
5
6
7
8
9
10
11
12
13
14
15
16
17
18
19
20
21
22
23
24
25
26
27
28
29
|
<script type="text/babel">
//创建组件
class Demo extends React.Component{
/*
React.createRef调用后可以返回一个容器,该容器可以存储被ref所标识的节点,该容器是"专人专用"的
*/
myRef = React.createRef()
myRef2 = React.createRef()
//展示左侧输入框的数据
showData = ()=>{
alert(this.myRef.current.value);
}
//展示右侧输入框的数据
showData2 = ()=>{
alert(this.myRef2.current.value);
}
render(){
return(
<div>
<input ref={this.myRef} type="text" placeholder="点击按钮提示数据"/>
<button onClick={this.showData}>点我提示左侧的数据</button>
<input onBlur={this.showData2} ref={this.myRef2} type="text" placeholder="失去焦点提示数据"/>
</div>
)
}
}
//渲染组件到页面
ReactDOM.render(<Demo a="1" b="2"/>,document.getElementById('test'))
</script>
|
Ajax 和 Axios
前置说明
- React 本身只关注于界面, 并不包含发送 ajax 请求的代码
- 前端应用需要通过 ajax 请求与后台进行交互(json 数据)
- react 应用中需要集成第三方 ajax 库(或自己封装)
Ajax 请求库
- jQuery: 比较重, 如果需要另外引入不建议使用
- axios: 轻量级, 建议使用
- 封装 XmlHttpRequest 对象的 ajax(XHR)
- promise 风格
- 可以用在浏览器端和 node 服务器端
Axios 请求
1
2
3
4
5
6
7
8
9
10
11
12
13
14
15
16
17
18
19
20
21
22
23
24
25
26
27
28
29
30
31
32
33
|
1) GET请求
axios.get('/user?ID=12345')
.then(function (response) {
console.log(response.data);
})
.catch(function (error) {
console.log(error);
});
axios.get('/user', {
params: {
ID: 12345
}
})
.then(function (response) {
console.log(response);
})
.catch(function (error) {
console.log(error);
});
2) POST请求
axios.post('/user', {
firstName: 'Fred',
lastName: 'Flintstone'
})
.then(function (response) {
console.log(response);
})
.catch(function (error) {
console.log(error);
});
|
Server.js 代理
- 除了熟知的 nginx 代理,还可以用 js 实现代理。
- 代理是为了解决跨域请求,在前后端交互中,前端发给后端的请求被后端接收到,但是后端返回给前端的数据却无法被前端接收。
 1
 2
 3
 4
 5
 6
 7
 8
 9
10
11
12
13
14
15
16
17
18
19
20
21
22
23
24
25
26
27
28
29
30
31
32
33
34
35
36
37
38
39
40
41
42
43
44
45
46
47
48
49
50
51
|
export default class App extends React.Component {
	getStudentData = () => {
		axios.get('http://localhost:3000/api1/students').then(
			(response) => {
				console.log('成功了', response.data);
			},
			(error) => {
				console.log('失败了', error);
			}
		);
	};

	getCarData = () => {
		axios.get('http://localhost:3000/api2/cars').then(
			(response) => {
				console.log('成功了', response.data);
			},
			(error) => {
				console.log('失败了', error);
			}
		);
	};

	render() {
		return (
			<div>
				<button onClick={this.getStudentData}>点我获取学生数据</button>
				<button onClick={this.getCarData}>点我获取汽车数据</button>
			</div>
		);
	}
}

//引入了 http-proxy-middleware 库,它提供了一种简单的方法来创建代理中间件。
const proxy = require('http-proxy-middleware');

module.exports = function (app) {
	app.use(
		proxy('/api1', {
			//遇见/api1前缀的请求,就会触发该代理配置
			target: 'http://localhost:5000', //请求转发给谁
			changeOrigin: true, //控制服务器收到的请求头中Host的值。Host请求标识请求来源
			pathRewrite: { '^/api1': '' }, //重写请求路径(必须)
		}),
		proxy('/api2', {
			target: 'http://localhost:5001',
			changeOrigin: true,
			pathRewrite: { '^/api2': '' },
		})
	);
};
|
路由
哈希路由和浏览器路由
BrowserRouter 与 HashRouter 的区别
1.底层原理不一样:
BrowserRouter 使用的是 H5 的 history API,不兼容 IE9 及以下版本。
HashRouter 使用的是 URL 的哈希值。
2.path 表现形式不一样
BrowserRouter 的路径中没有#,例如:localhost:3000/demo/test
HashRouter 的路径包含#,例如:localhost:3000/#/demo/test
3.刷新后对路由 state 参数的影响
(1).BrowserRouter 没有任何影响,因为 state 保存在 history 对象中。
(2).HashRouter 刷新后会导致路由 state 参数的丢失!!!
4.备注:HashRouter 可以用于解决一些路径错误相关的问题。
编程式路由导航
不需要用户触发,可以自动跳转链接
借助 this.prosp.history 对象上的 API 对操作路由跳转、前进、后退
-this.prosp.history.push()
-this.prosp.history.replace()
-this.prosp.history.goBack()
-this.prosp.history.goForward()
-this.prosp.history.go()
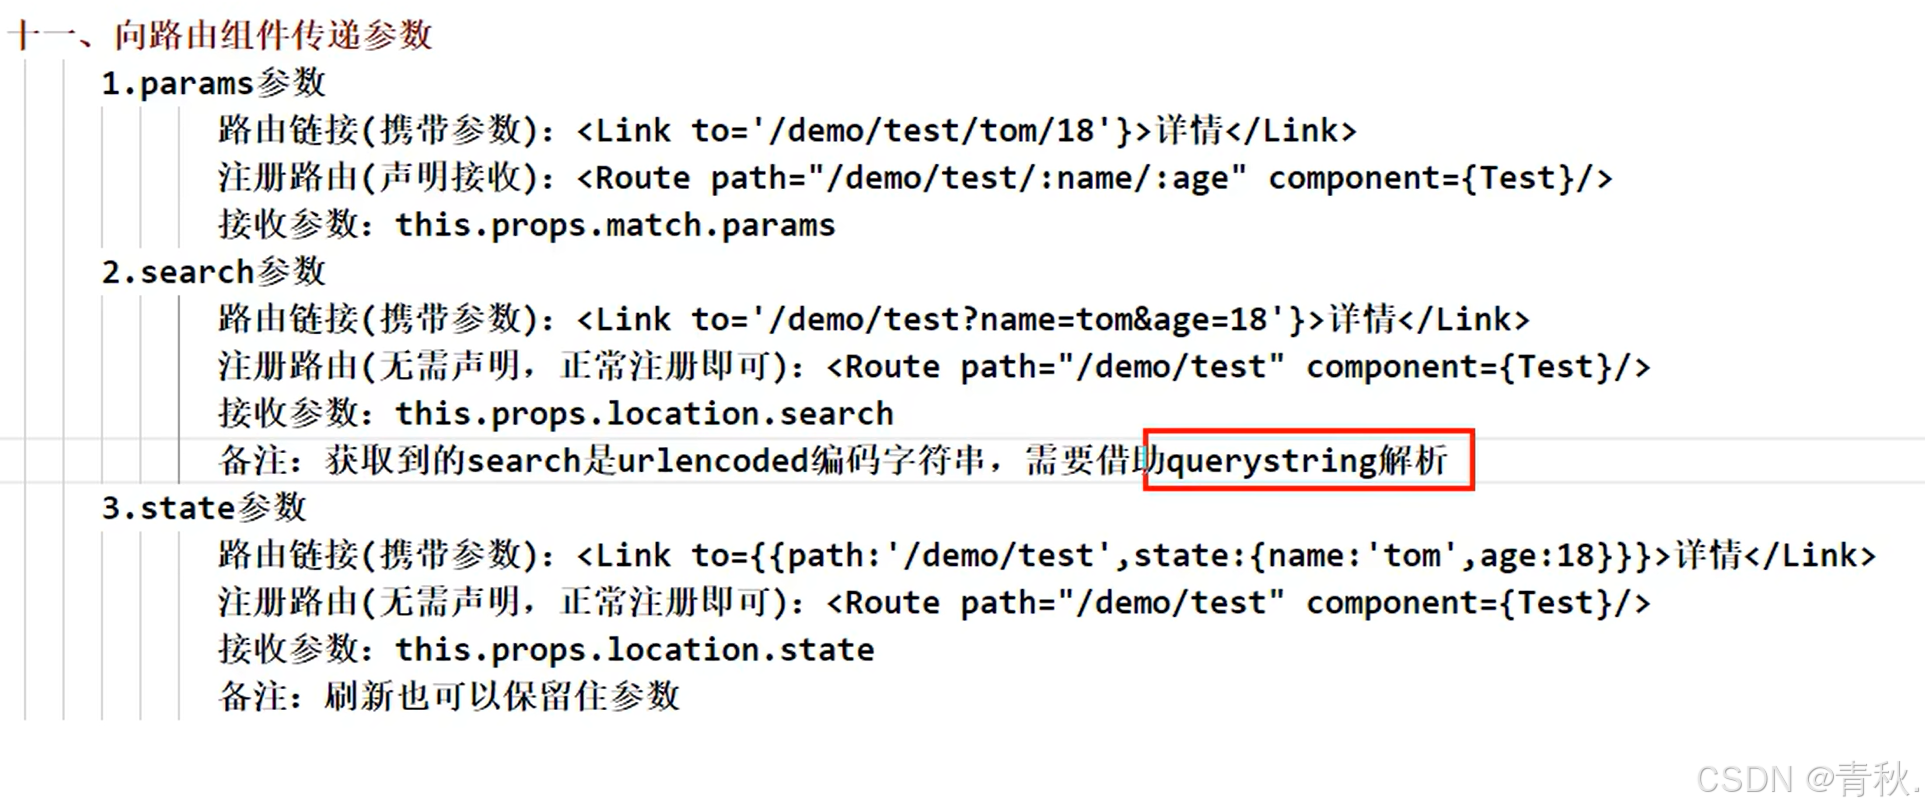
向路由组件传参