集群配置
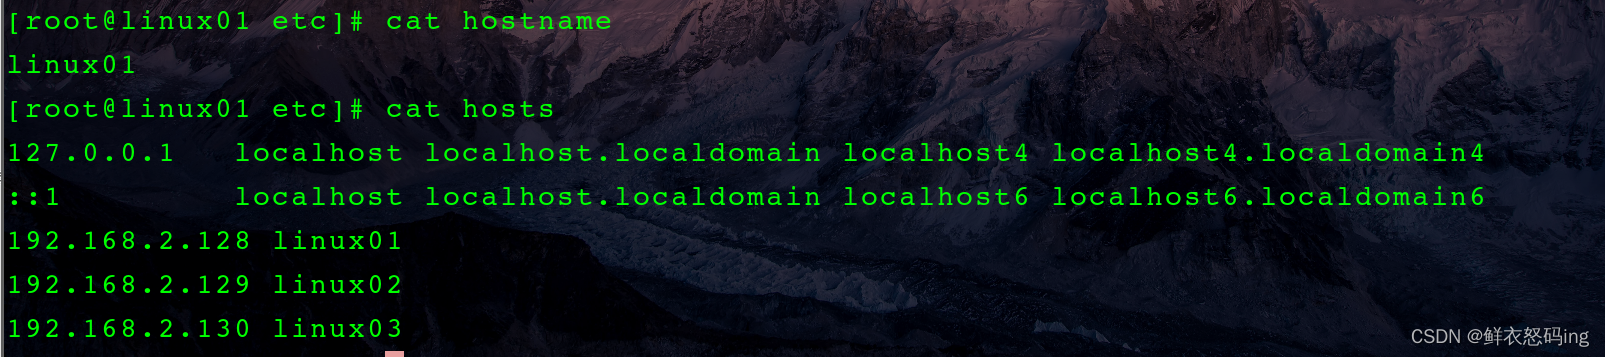
三台服务器:linux01、linux02、linux03
每台服务器均安装了 zookeeper、kafka,服务器之间做了 ssh 免密登录(集群启停脚本用)
kafka 虽然内置了 zk,但是这里用的是自己安装的 zk。
服务器之间加了 ip 映射,如 hosts 文件所示,这样就不需要 p 地址,只需要服务器名字就可以了
集群启动
注意事项
- 启动时先启动 zk,再启动 kafka
- 关闭时先关闭 kafka,再关闭 zk,因为 kafka 需要 zk 来维护数据信息,再关闭前 kafka 要和 zk 通讯。
- kafka-server-start.sh -daemon config/server.properties
- kafka-server-stop.sh
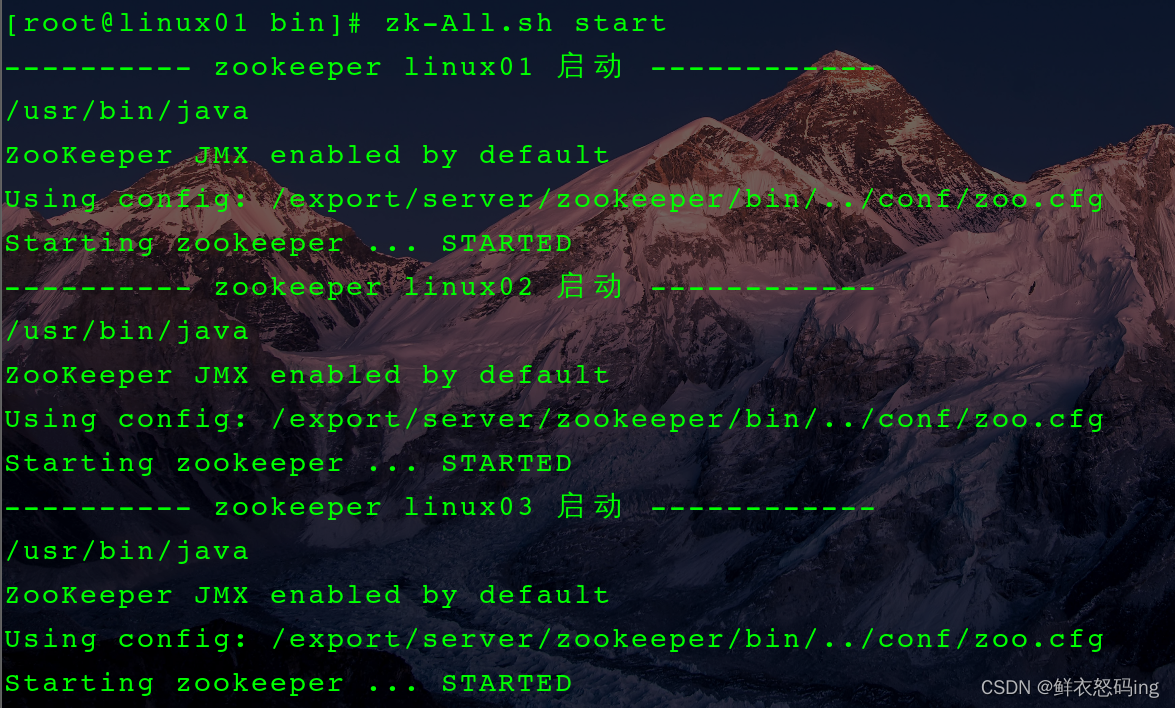
脚本启动 zk 集群
脚本启动 kafka 集群
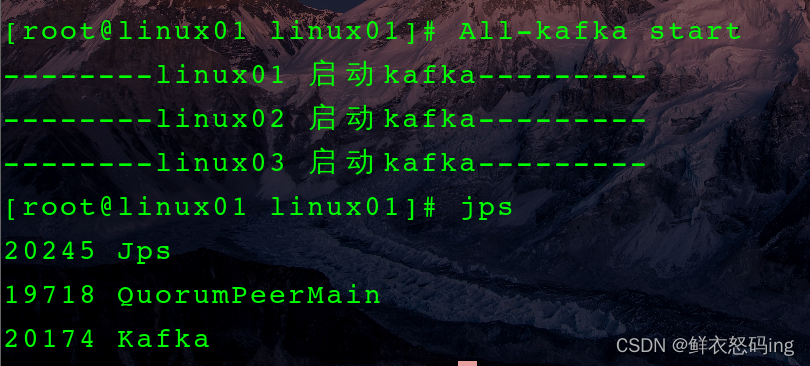
启动成功
启动成功,三台服务器均显示如下:
 查看 zk 客户端,根节点下已经有了 kafka 节点
默认直接在根节点下生成 admin、brokers、cluster 等节点,但是不方便维护,因此在 server.properties 文件中改了配置,让所有节点统一生成在 kafka 节点。

zk 集群启停脚本
 1
 2
 3
 4
 5
 6
 7
 8
 9
10
11
12
13
14
15
16
17
18
19
20
21
22
23
24
25
26
|
#!/bin/bash
#zookeeper集群启停及状态查看脚本
ZOOKEEPER="/export/server/zookeeper"
case $1 in
"start")
	for i in linux01 linux02 linux03
	do
		echo ---------- zookeeper $i 启动 ------------
		ssh $i "$ZOOKEEPER/bin/zkServer.sh start"
	done
	;;
"stop")
	for i in linux01 linux02 linux03
	do
		echo ---------- zookeeper $i 停止 ------------
		ssh $i "$ZOOKEEPER/bin/zkServer.sh stop"
	done
	;;
"status")
	for i in linux01 linux02 linux03
	do
		echo ---------- zookeeper $i 状态 ------------
		ssh $i "$ZOOKEEPER/bin/zkServer.sh status"
	done
	;;
esac
|
kafka 集群启停脚本
 1
 2
 3
 4
 5
 6
 7
 8
 9
10
11
12
13
14
15
16
17
|
#!/bin/bash
case $1 in
"start"){
        for i in linux01 linux02 linux03
                do
                        echo --------$i 启动kafka---------
                        ssh $i "source /etc/profile;/export/server/kafka/bin/kafka-server-start.sh -daemon /export/server/kafka/config/server.properties"
                done
};;
"stop"){
        for i in linux01 linux02 linux03
                do
                        echo --------$i 停止kafka---------
                        ssh $i "source /etc/profile;/export/server/kafka/bin/kafka-server-stop.sh stop"
                done
};;
esac
|
Kafka 操作
–bootstrap-server 是连接 kafka,对于集群而言,连接任何一台服务器的 kafka 都是一样的
命令行创建 Topic

消费者生产者联动

 先启动生产者,生产 hello、hahaha,再启动消费者,生产者再生产 aaaaa、bbbb。此时 hello、hahaha 属于历史消息,不会显示,只显示 aaaaa、bbbb,若想显示历史消息,需要如下,此时消息是乱序的:

Linux 配置 EFAK3.0.1
1. 配置 EFAK 的环境变量
ke.sh 文件中引用的 efak 变量名是 KE_HOME,所以环境变量名一定是 KE_HOME,否则 efak 无法启动

source /etc/profile
2. 修改 kafka 的 bin/kafka-server-start.sh 的内存配置,如果不修改,可能无法启动 efak

内容如下:
1
2
3
4
5
6
|
if [ "x$KAFKA_HEAP_OPTS" = "x" ]; then
    #export KAFKA_HEAP_OPTS="-Xmx1G -Xms1G"
    export KAFKA_HEAP_OPTS="-server     -Xms2G   -Xmx2G   -XX:PermSize=128m   -XX:+UseG1GC   -XX:MaxGCPauseMillis=200  -XX:ParallelGCThreads=8   -XX:ConcGCThreads=5   -XX:InitiatingHeapOccupancyPercent=70"
    #监控kafka运行的端口号9999
    export JMX_PORT="9999"
fi
|
注意!修改 kafka 配置文件后记得重新分发给集群其他的 kafka!
scp kafka-server-start.sh root@linux02:/export/server/kafka/bin
scp kafka-server-start.sh root@linux03:/export/server/kafka/bin
3. 修改 EFAK 的 conf/system-config.properties 文件,关键内容如下

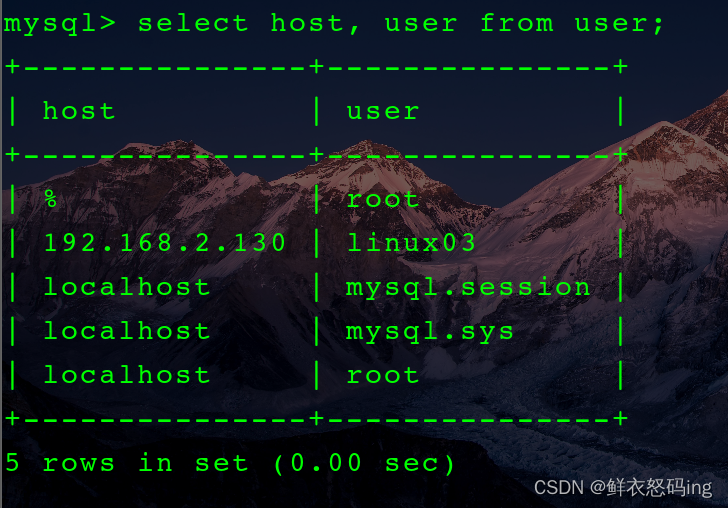
EFAK 需要配置 mysql 的ke 数据库来存储元数据,username 是连接 mysql 的登录用户,名字随便起,和 linux03 服务器无关,需要提前在 mysql 创建好并授权访问。
我的mysql5.7 在 linux01 服务器,而 EFAK 在 linux03 服务器,这就需要跨服务器连接,解决方法如下。
4. 在 linux01 的 mysql 创建名为 linux03 的用户,并授予对 ke 数据库的所有权,并规定只有服务器 linux03 的 ip 地址才能访问。
CREATE USER ’linux03’@‘xxx.xxx.x.xxx’ IDENTIFIED BY ‘#252012’;
GRANT ALL PRIVILEGES ON ke.* TO ’linux03’@‘xxx.xxx.x.xxx’;
注:这里的 xxx.xxx.x.xxx 是部署了 EFAK 的服务器 ip,也就是服务器 linux03 的 ip
如果创建用户失败,提示了创建的用户密码安全级别过低,那么可以降低密码安全级别
SET GLOBAL validate_password.policy = LOW;
flush privileges;
大概意思就是允许 ip 为 xxx.xxx.x.xxx 的 linux03 用户访问数据库
5. 启动并登录 EFAK
依次启动 zk、kafka
zk 和 kafka 集群启动脚本是我自己编写的
zk-All.sh start
All-kafka start
然后 ke.sh start
 启动成功!
启动成功!
账户是 admin,密码 123456
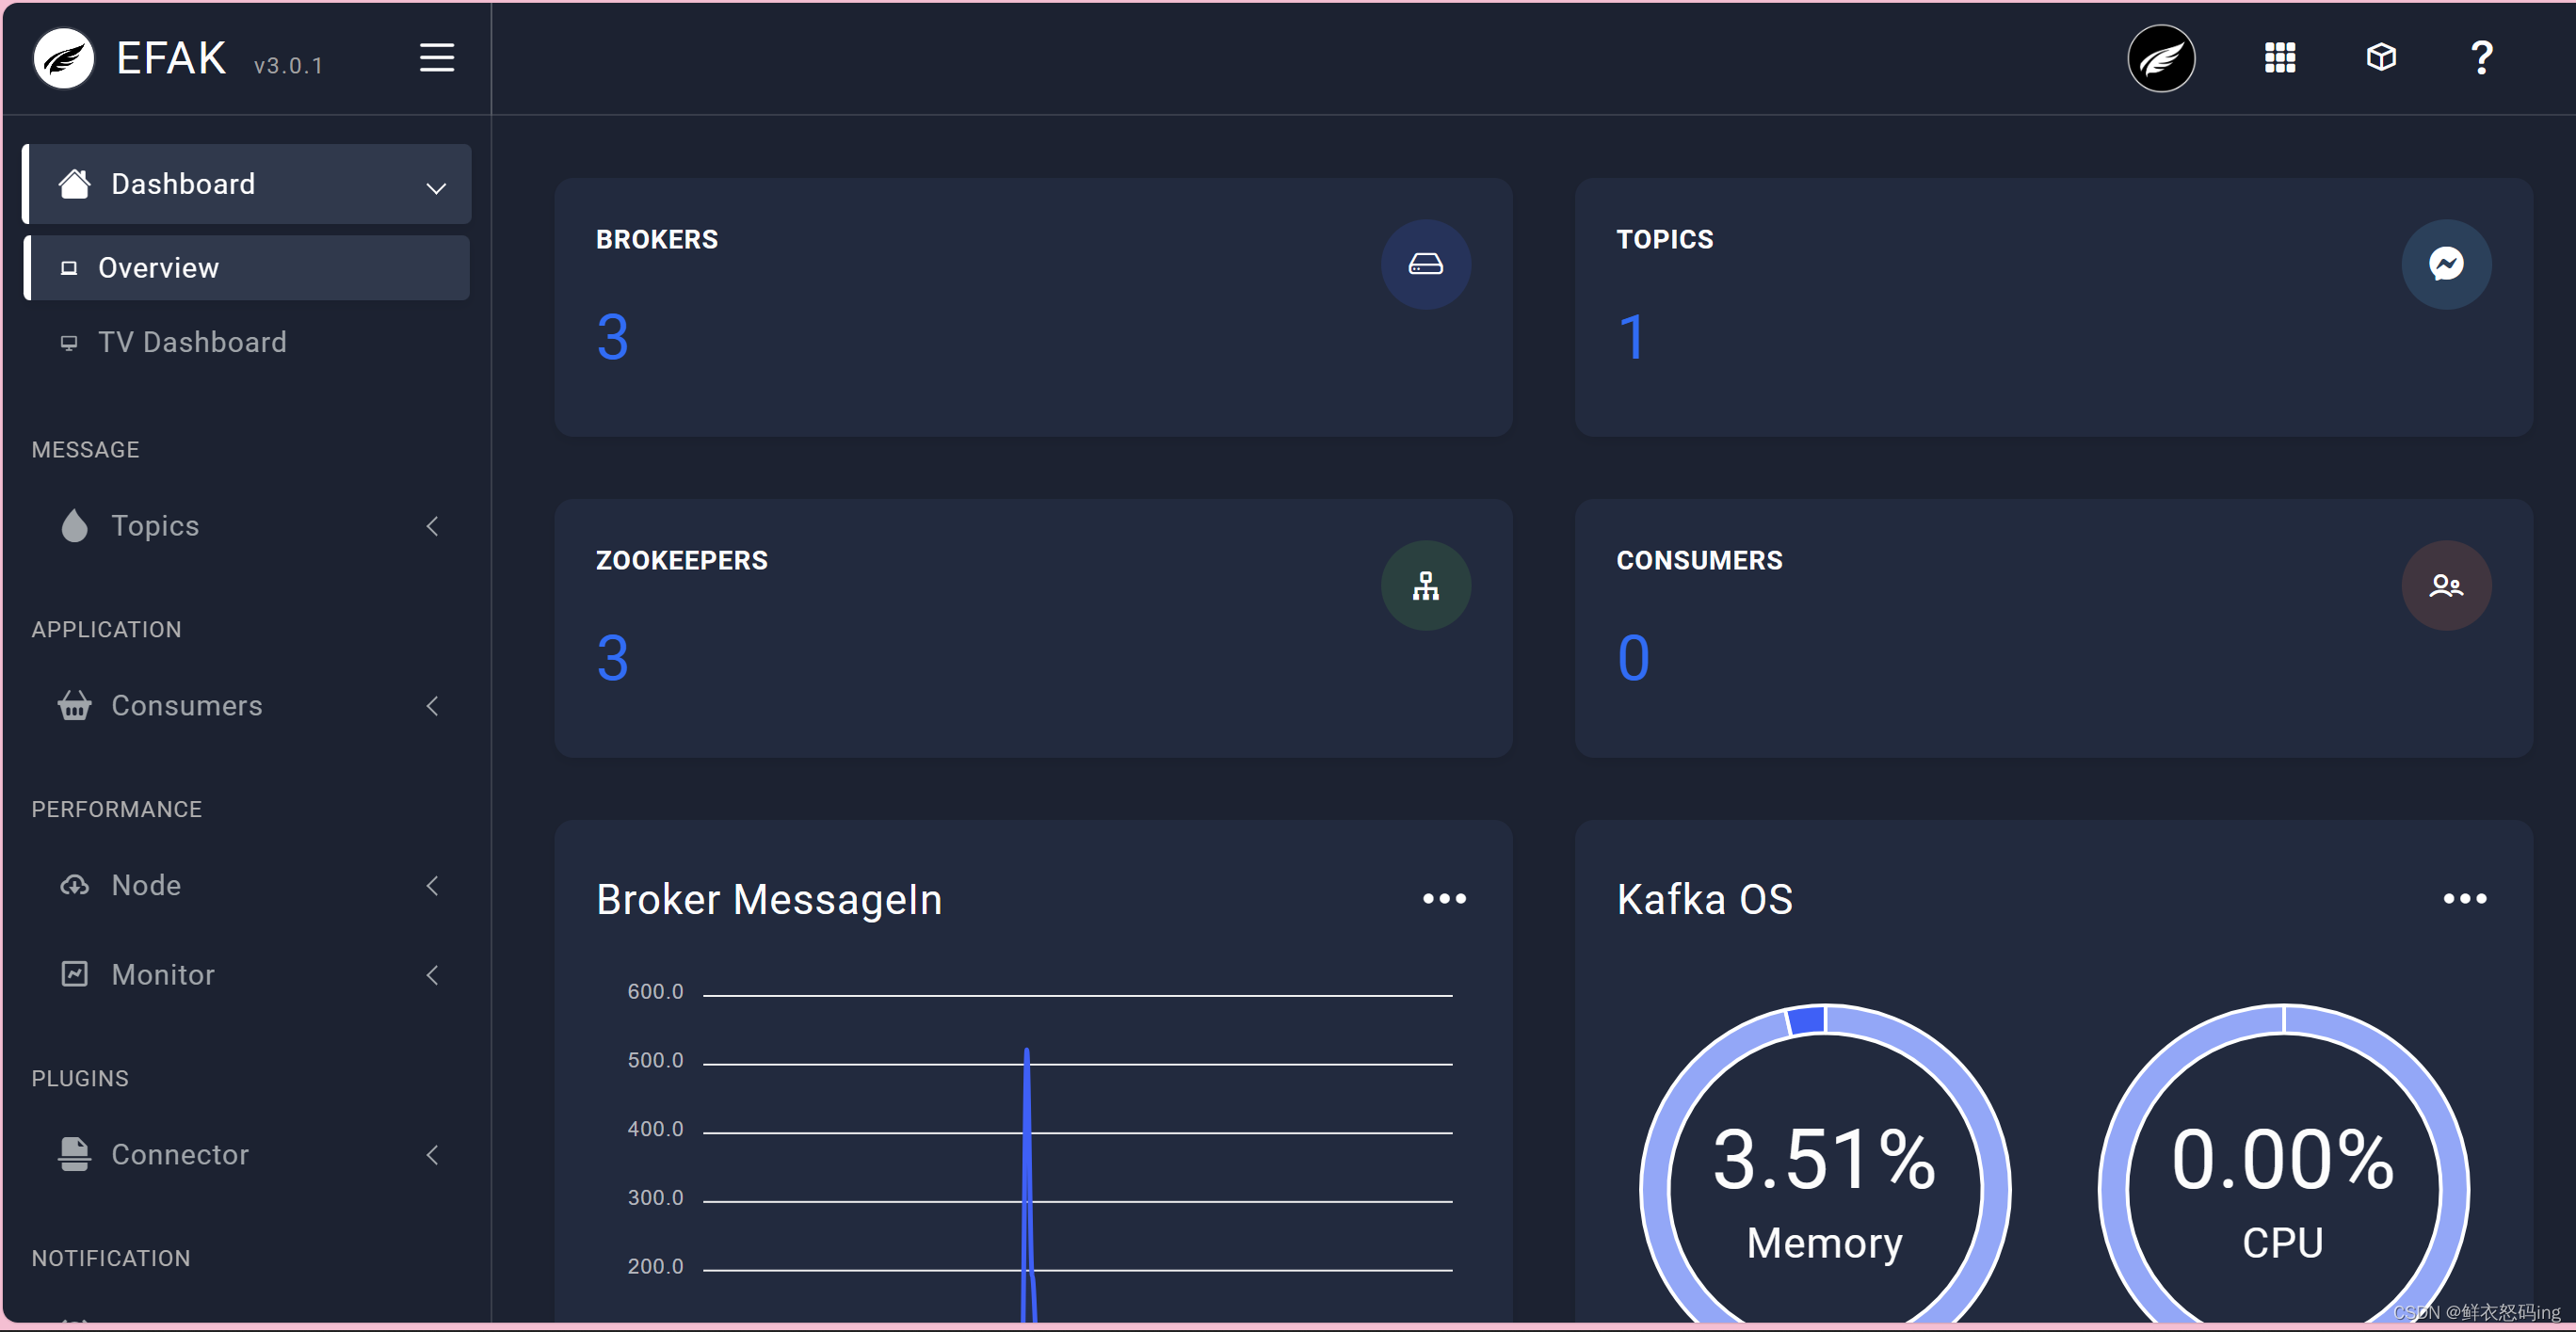 >
> 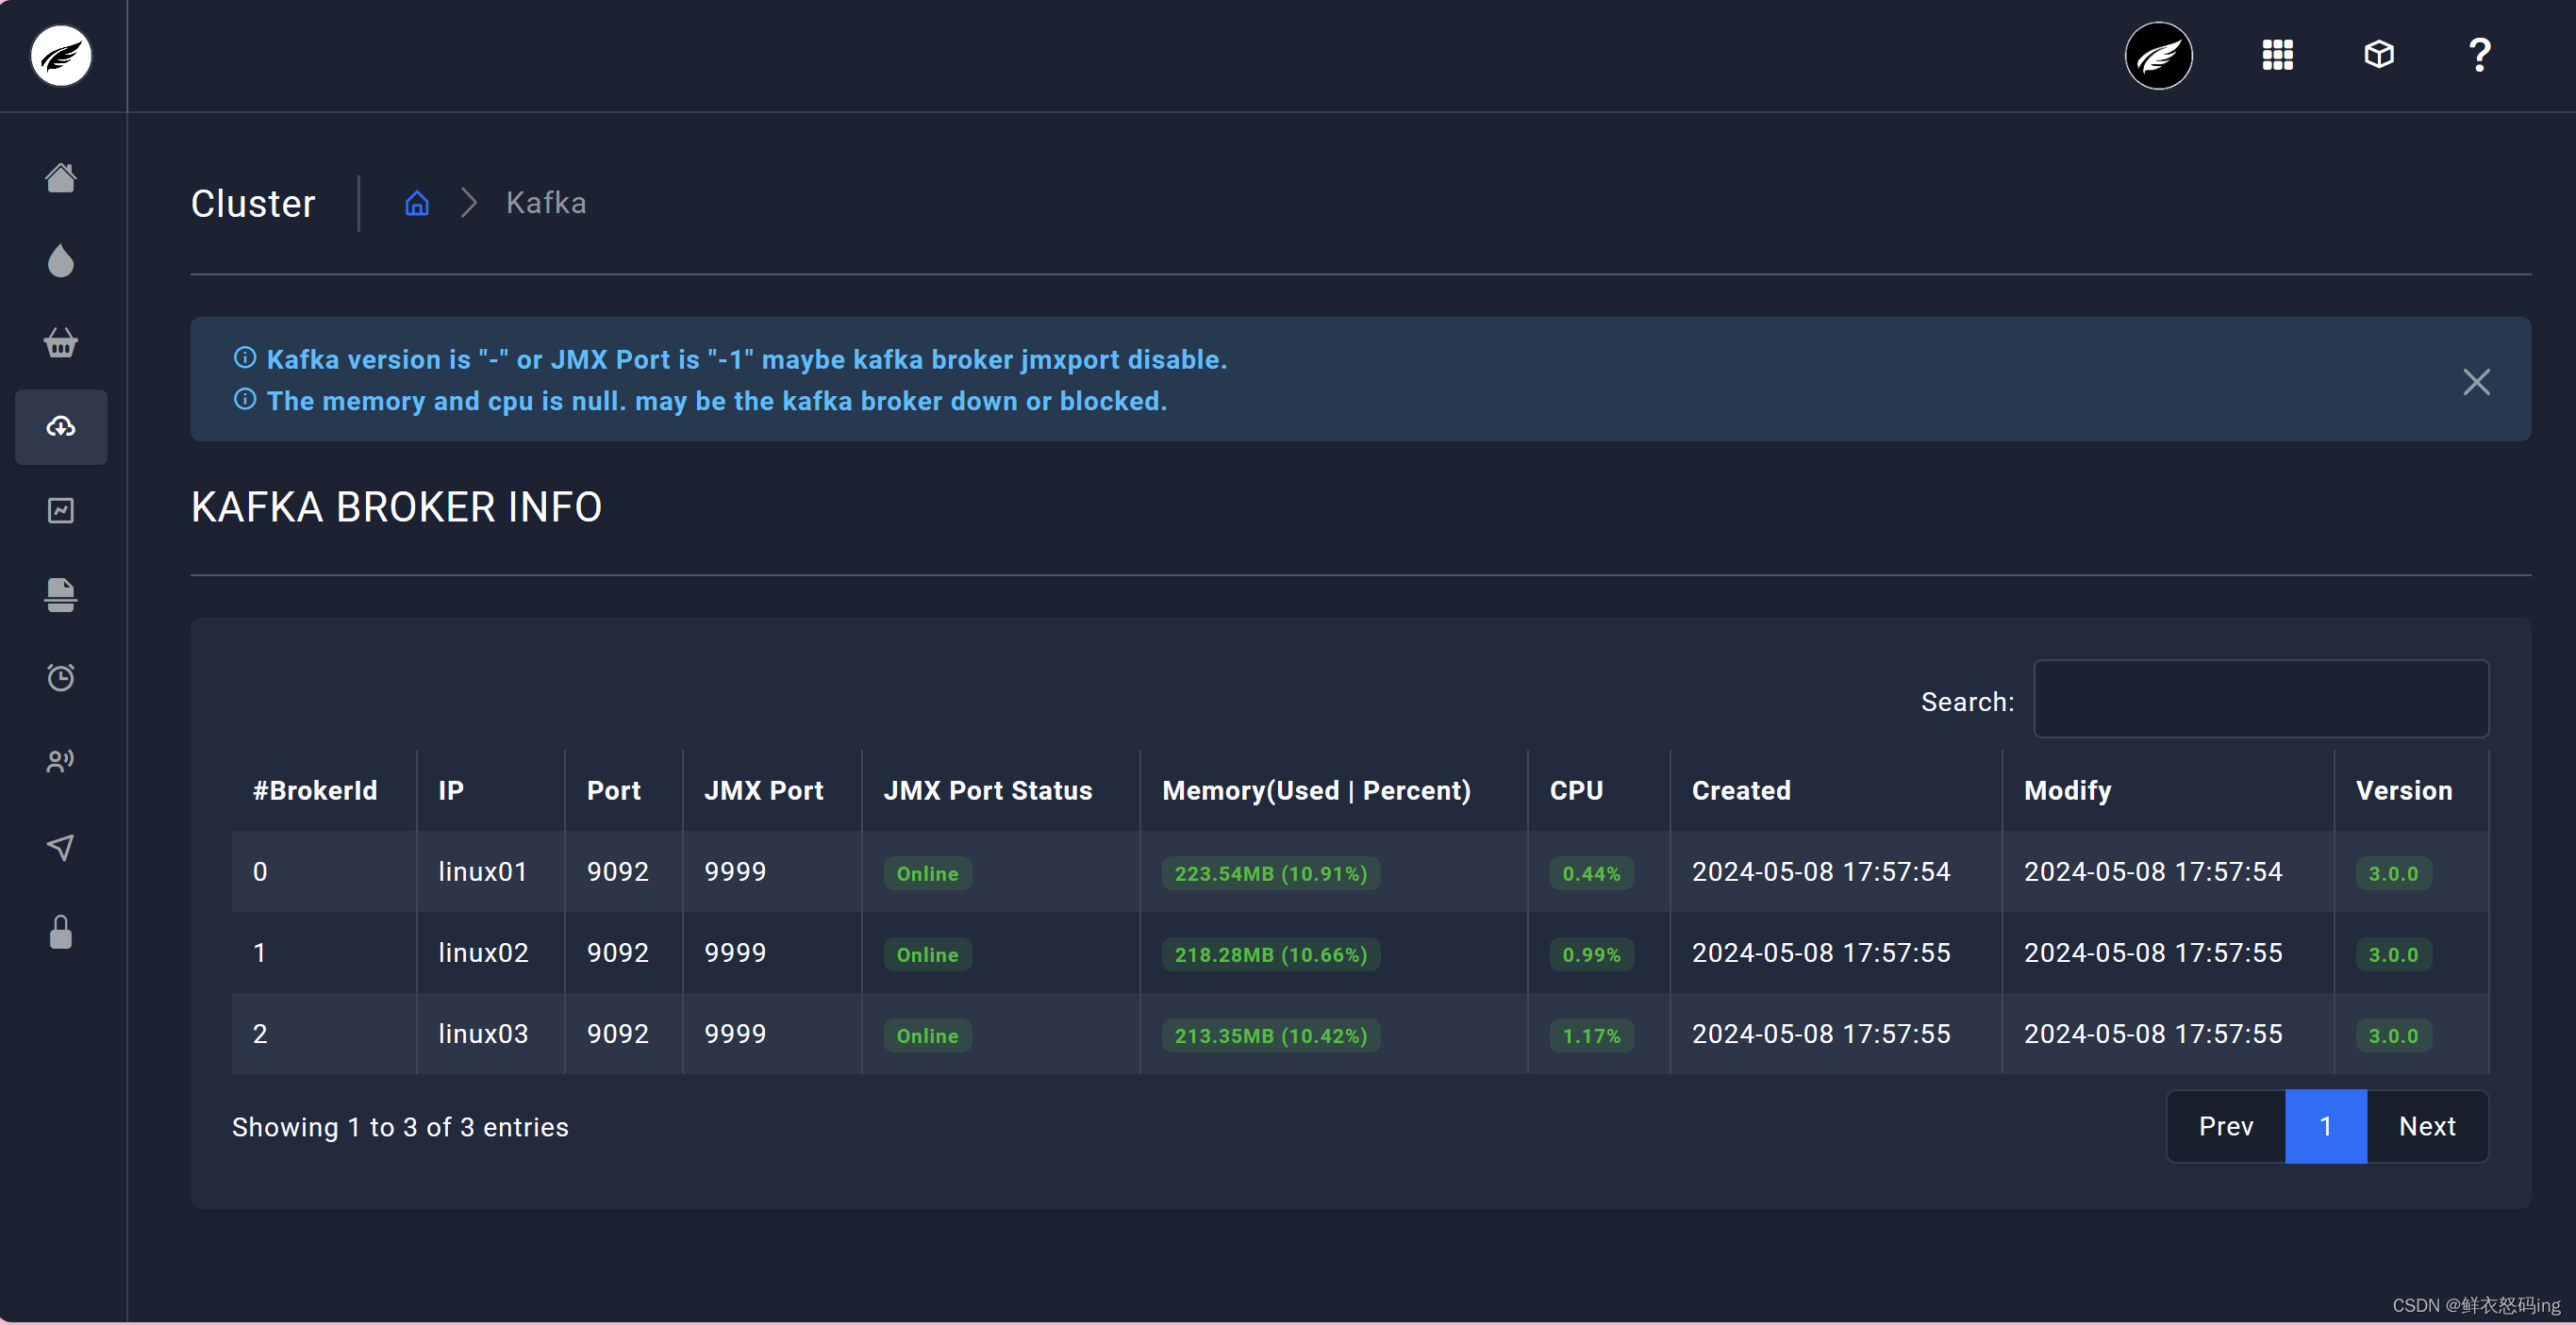 访问成功,可以看到 3 台 broker 成功运行
Kraft 模式集群
在 Kafka 2.8.0 版本,移除了对 Zookeeper 的依赖,通过 Kraft 模式的 controller管理集群,使用 Kafka 内部的 Quorum 控制器来取代 ZooKeeper 管理元数据,元数据保存在 controller中,这样我们无需维护 zk 集群,只要维护 Kafka 集群就可以了,节省运算资源。
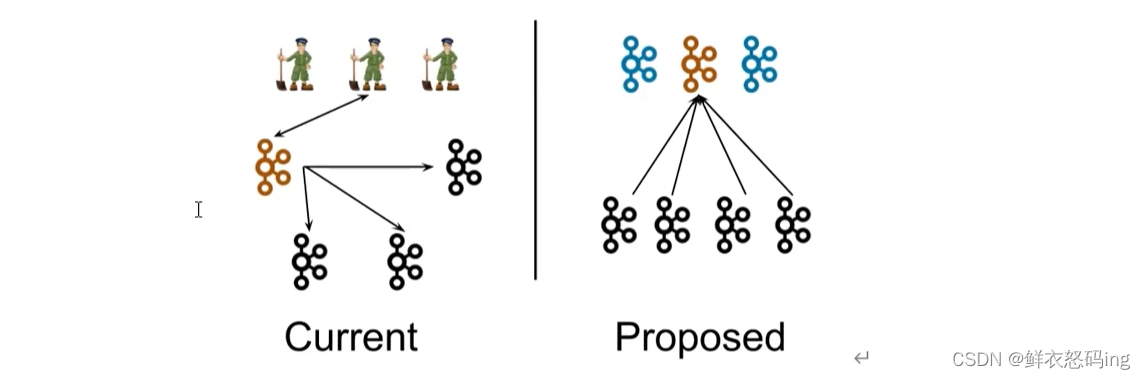
优点
- kafka 不再依赖外部框架,能独立运行
- controller 管理集群时不需要和 zk 通讯,集群性能提升
- 脱离了 zk 依赖,集群扩展不受 zk 读写能力的限制
- controller 不再动态选举,而由配置文件决定,这样可以针对性的加强 controller 的节点配置,而不是像以前一样对随机 controller 节点的高负载束手无策。
配置
不在原来的 kafka 集群操作,这里换新的 kafka 集群
编辑 kafka 的 config/kraft 目录下的 server.properties 文件
linux01 服务器配置如下:
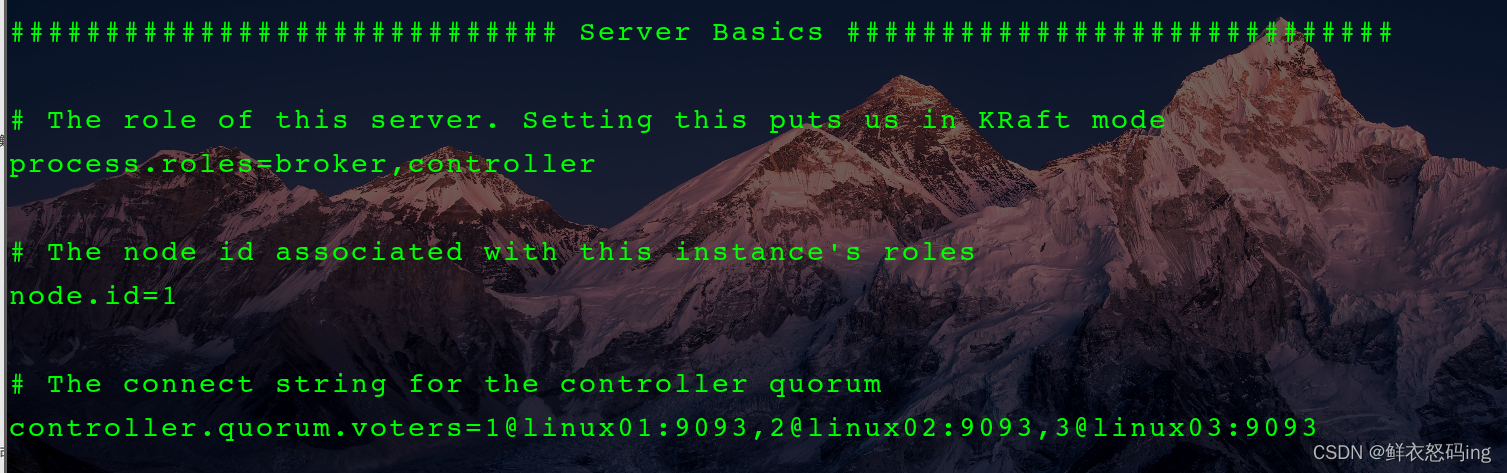


配好后分发该配置文件,并在各个服务器修改对应的参数,如 node.id、advertised.listeners、log.dirs
启动前初始化集群
在 linux01 生成存储目录唯一 ID

用该 ID 格式化所有服务器的 kafka 存储目录


启动 kraft 集群,这里使用自定义脚本,把脚本配置到环境变量,效果更佳
 1
 2
 3
 4
 5
 6
 7
 8
 9
10
11
12
13
14
15
16
17
18
19
20
21
22
23
24
|
#!/bin/bash
case $1 in
"start"){
        for i in linux01 linux02 linux03
                do
                        echo --------$i 启动kraft---------
                        ssh $i "source /etc/profile;/export/server/kraft/bin/kafka-server-start.sh -daemon /export/server/kraft/config/kraft/server.properties"
                done
};;
"stop"){
        for i in linux01 linux02 linux03
                do
                        echo --------$i 停止kraft---------
                        ssh $i "source /etc/profile;/export/server/kraft/bin/kafka-server-stop.sh stop"
                done
};;
"status"){
        for i in linux01 linux02 linux03
                do
                        echo --------$i 查看kraft状态---------
                        ssh $i "source /etc/profile;jps -ml"
                done
};;
esac
|
查看是否启动成功,这里也使用脚本一键查看集群所有 jps,把脚本配置到环境变量,效果更佳
1
2
3
4
5
6
|
#!/bin/bash
        for i in linux01 linux02 linux03
                do
                        echo --------$i 查看jps---------
                        ssh $i "source /etc/profile; jps"
                done
|
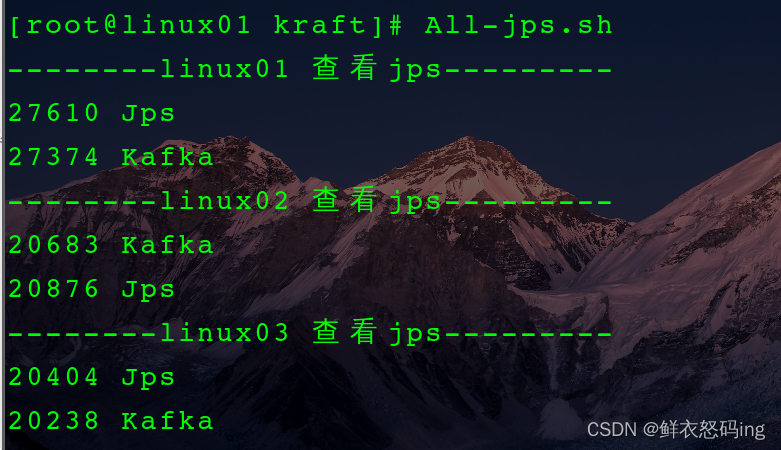
无需 zk,启动成功!
浅浅把玩 Kraft
创建主题 first

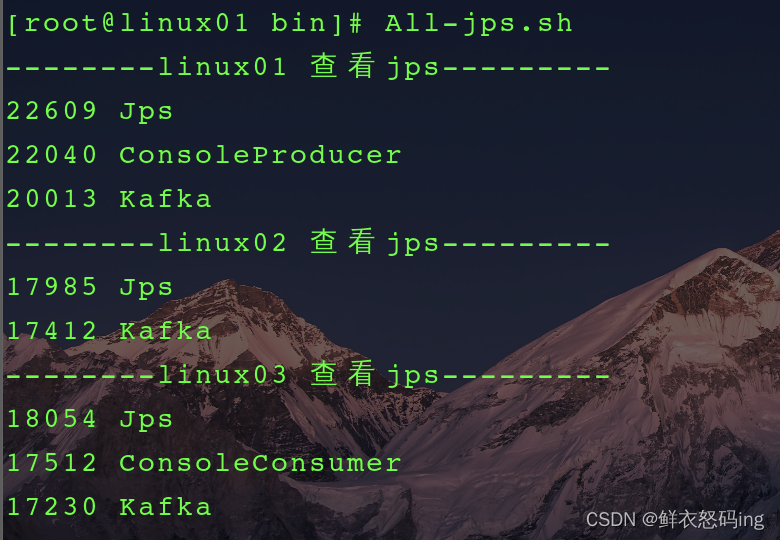
 在 linux01 创建生产者,在 linux03 创建消费者


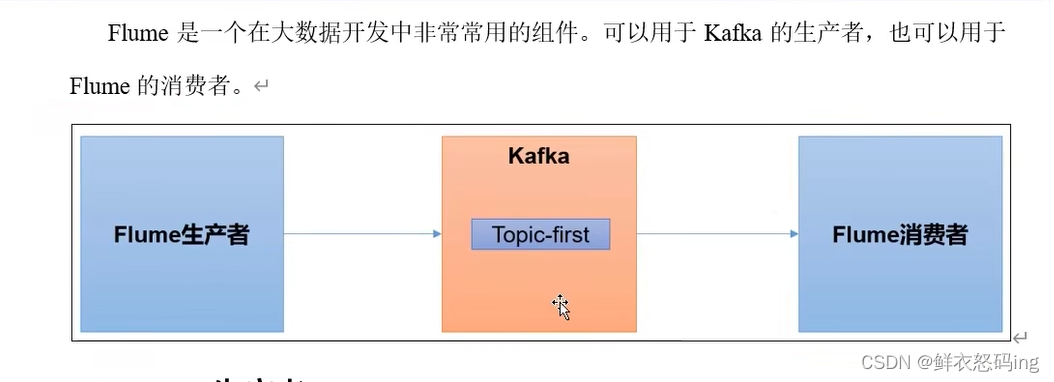
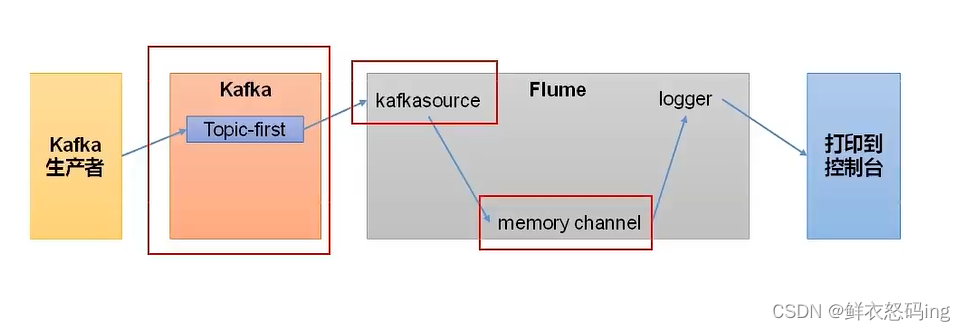
Flume 联动 kafka
Flume 作为生产者
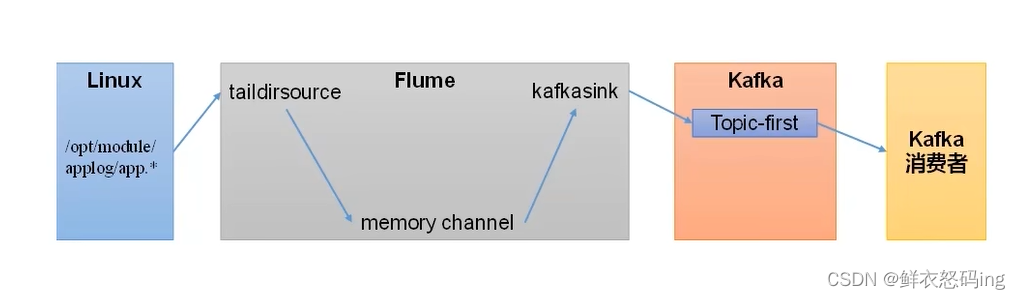
案例玩法:依次启动 zk、kafka 集群,在 linux01 编辑 flume 的 file_to_kafka.conf 任务配置,监控 app.log 文件内容,把监控的内容发送到 kafka 的 first 主题,然后启动 flume 任务作为生产者。在 linux02 启动 kafka 消费者,消费 first 主题,检查 linux01 的监控文件 app.log 变化时,消费者是否消费到了消息。
flume 的 job/group3/file_to_kafka.conf 配置:
 1
 2
 3
 4
 5
 6
 7
 8
 9
10
11
12
13
14
15
16
17
18
19
20
21
22
23
24
25
26
27
28
29
30
31
|
#定义source,sink,channel
a3.sources = r3
a3.sinks = k3
a3.channels = c3

# 配置source
#
a3.sources.r3.type = TAILDIR
a3.sources.r3.filegroups=f3
#监控的目录
a3.sources.r3.filegroups.f3=/export/server/flume/job/group3/applog/app.*
#断点续传的json
a3.sources.r3.positionFile=/export/server/flume/job/group3/tail_dir2.json


# 配置 sink
a3.sinks.k3.type = org.apache.flume.sink.kafka.KafkaSink
a3.sinks.k3.kafka.bootstrap.servers=linux01:9092,linux02:9092,linux03:9092
a3.sinks.k3.kafka.topic=first
a3.sinks.k3.kafka.flumeBatchSize=20
a3.sinks.k3.kafka.producer.acks=1
a3.sinks.k3.kafka.producer.linger.ms=1

# 配置channel
a3.channels.c3.type = memory
a3.channels.c3.capacity = 1000
a3.channels.c3.transactionCapacity = 100

# Bind the source and sink to the channel
a3.sources.r3.channels = c3
a3.sinks.k3.channel = c3
|
确保 zk,kafka 集群已启动
- 在 linux02 创建 kafka 消费者,消费 first 主题
kafka-console-consumer.sh –bootstrap-server linux02:9092 –topic first
- 在 linux01 启动 flume 任务
bin/flume-ng agent -c conf/ -n a3 -f job/group3/file_to_kafka.conf
- 对监控的文件 app.log 追加内容,kafka 消费者成功接收到消息
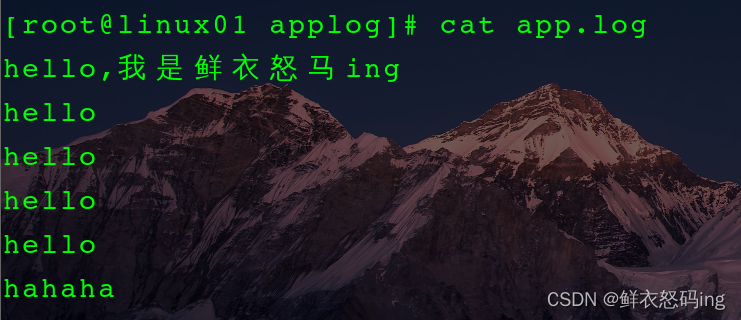 >
> 
Flume 作为消费者
在 linux01 的 flume 的 job 目录下编辑 kafka_to_file.conf 文件,内容如下:
 1
 2
 3
 4
 5
 6
 7
 8
 9
10
11
12
13
14
15
16
17
18
19
20
21
22
23
24
|
# Name the components on this agent
a2.sources = r2
a2.sinks = k2
a2.channels = c2

# Describe/configure the source
a2.sources.r2.type = org.apache.flume.source.kafka.KafkaSource
a2.sources.r2.batchSize=50
a2.sources.r2.batchDurationMillis=200
a2.sources.r2.kafka.bootstrap.servers=linux02:9092
a2.sources.r2.kafka.topics=first
a2.sources.r2.kafka.consumer.group.id=custom.g.id

# Describe the sink
a2.sinks.k2.type = logger

# Use a channel which buffers events in memory
a2.channels.c2.type = memory
a2.channels.c2.capacity = 1000
a2.channels.c2.transactionCapacity = 100

# Bind the source and sink to the channel
a2.sources.r2.channels = c2
a2.sinks.k2.channel = c2
|
依次启动 zk、kafka 集群,然后启动 flume 任务和 kakfa 生产者
- flume-ng agent -n a2 -c conf/ -f job/kafka_to_file.conf -Dflume.root.logger=INFO,console
- kafka-console-producer.sh –bootstrap-server linux03:9092 –topic first


案例成功!
SpringBoot 联动 kakfa
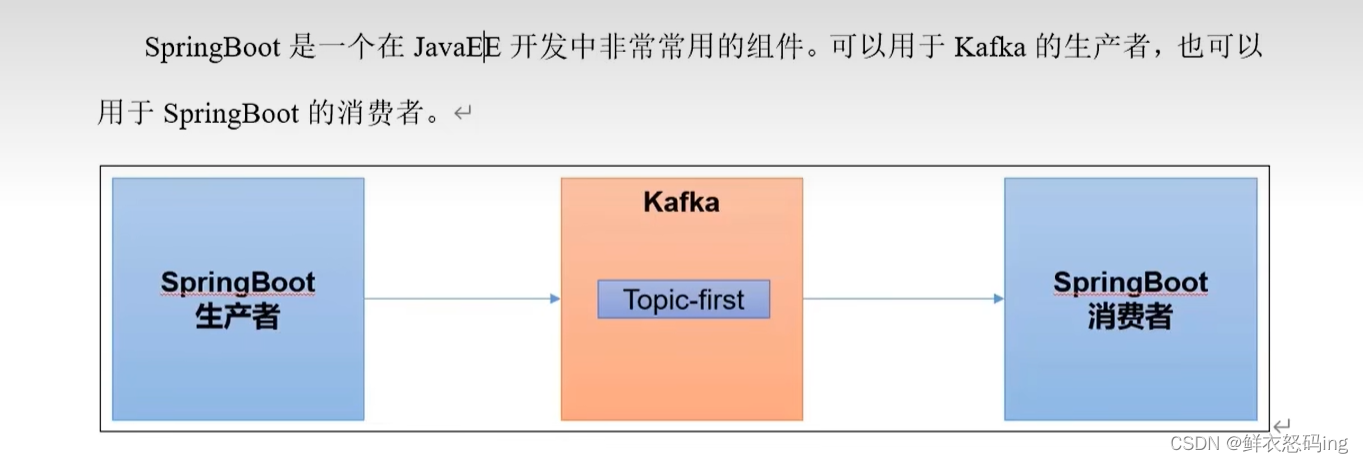
SpringBoot 作为生产者
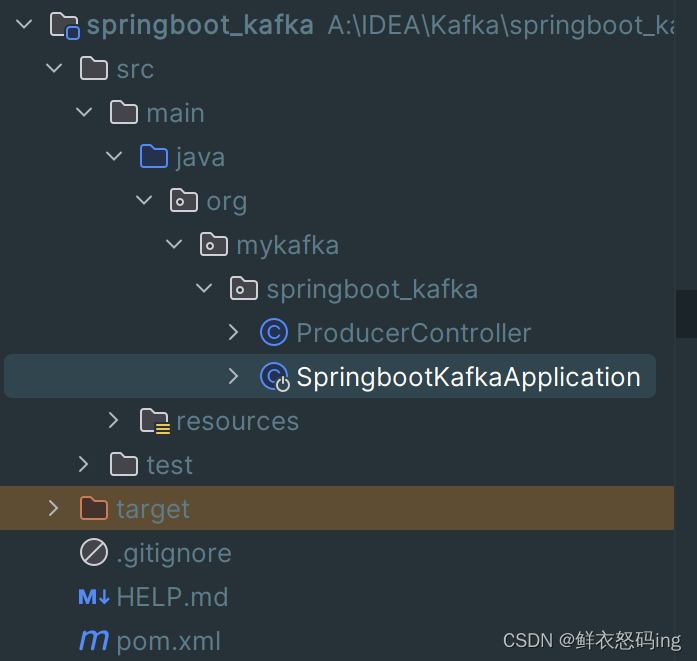
创建 springboot 工程
application.properties 文件内容如下:
1
2
3
4
5
6
7
|
server.port=8080
#连接kafka集群
spring.kafka.bootstrap-servers=linux01:9092,linux02:9092,linux03:9092

#key-value序列化
spring.kafka.producer.key-serializer=org.apache.kafka.common.serialization.StringSerializer
spring.kafka.producer.value-serializer=org.apache.kafka.common.serialization.StringSerializer
|
pom 文件内容如下:
 1
 2
 3
 4
 5
 6
 7
 8
 9
10
11
12
13
14
15
16
17
18
19
20
21
22
23
24
25
26
27
28
29
30
31
32
33
34
35
36
37
38
39
40
41
42
43
44
45
46
47
48
49
50
51
52
53
54
55
56
57
58
59
60
61
62
63
64
65
66
67
68
69
70
71
72
73
74
75
76
77
78
79
80
81
82
83
84
85
86
|
<?xml version="1.0" encoding="UTF-8"?>
<project xmlns="http://maven.apache.org/POM/4.0.0" xmlns:xsi="http://www.w3.org/2001/XMLSchema-instance"
         xsi:schemaLocation="http://maven.apache.org/POM/4.0.0 https://maven.apache.org/xsd/maven-4.0.0.xsd">
    <modelVersion>4.0.0</modelVersion>
    <groupId>org.mykafka</groupId>
    <artifactId>springboot_kafka</artifactId>
    <version>0.0.1-SNAPSHOT</version>
    <name>springboot_kafka</name>
    <description>springboot_kafka</description>
    <properties>
        <java.version>1.8</java.version>
        <project.build.sourceEncoding>UTF-8</project.build.sourceEncoding>
        <project.reporting.outputEncoding>UTF-8</project.reporting.outputEncoding>
        <spring-boot.version>2.6.13</spring-boot.version>
    </properties>
    <dependencies>
        <dependency>
            <groupId>org.springframework.boot</groupId>
            <artifactId>spring-boot-starter-web</artifactId>
        </dependency>
        <dependency>
            <groupId>org.springframework.kafka</groupId>
            <artifactId>spring-kafka</artifactId>
        </dependency>

        <dependency>
            <groupId>org.projectlombok</groupId>
            <artifactId>lombok</artifactId>
            <optional>true</optional>
        </dependency>
        <dependency>
            <groupId>org.springframework.boot</groupId>
            <artifactId>spring-boot-starter-test</artifactId>
            <scope>test</scope>
        </dependency>
        <dependency>
            <groupId>org.springframework.kafka</groupId>
            <artifactId>spring-kafka-test</artifactId>
            <scope>test</scope>
        </dependency>
    </dependencies>
    <dependencyManagement>
        <dependencies>
            <dependency>
                <groupId>org.springframework.boot</groupId>
                <artifactId>spring-boot-dependencies</artifactId>
                <version>${spring-boot.version}</version>
                <type>pom</type>
                <scope>import</scope>
            </dependency>
        </dependencies>
    </dependencyManagement>

    <build>
        <plugins>
            <plugin>
                <groupId>org.apache.maven.plugins</groupId>
                <artifactId>maven-compiler-plugin</artifactId>
                <version>3.8.1</version>
                <configuration>
                    <source>1.8</source>
                    <target>1.8</target>
                    <encoding>UTF-8</encoding>
                </configuration>
            </plugin>
            <plugin>
                <groupId>org.springframework.boot</groupId>
                <artifactId>spring-boot-maven-plugin</artifactId>
                <version>${spring-boot.version}</version>
                <configuration>
                    <mainClass>org.mykafka.springboot_kafka.SpringbootKafkaApplication</mainClass>
                    <skip>true</skip>
                </configuration>
                <executions>
                    <execution>
                        <id>repackage</id>
                        <goals>
                            <goal>repackage</goal>
                        </goals>
                    </execution>
                </executions>
            </plugin>
        </plugins>
    </build>

</project>
|
ProducerController 代码
 1
 2
 3
 4
 5
 6
 7
 8
 9
10
11
12
13
14
15
16
17
18
19
20
21
22
23
24
25
26
27
|
package org.mykafka.springboot_kafka;

import org.springframework.beans.factory.annotation.Autowired;
import org.springframework.kafka.core.KafkaTemplate;
import org.springframework.web.bind.annotation.RequestMapping;
import org.springframework.web.bind.annotation.RestController;

/**
 * @Author:懒大王Smile
 * @Date: 2024/5/12
 * @Time: 22:42
 * @Description:
 */

@RestController
public class ProducerController {

    @Autowired
    KafkaTemplate<String,String> kafka;

    @RequestMapping("/ProducerSend")
    public String date(String msg){
        kafka.send("first",msg);
        System.out.println(msg);
        return "ok";
    }
}
|
项目展示
项目启动之后在浏览器访问,kafka 消费者成功接收到数据!


SpringBoot 作为消费者
application.properties 文件内容如下:
1
2
3
4
5
6
7
8
|
server.port=8080

#key-value反序列化
spring.kafka.consumer.key-deserializer=org.apache.kafka.common.serialization.StringDeserializer
spring.kafka.consumer.value-deserializer=org.apache.kafka.common.serialization.StringDeserializer

#消费者组id
spring.kafka.consumer.group-id=mykafka
|
ConsumerController 代码如下:
 1
 2
 3
 4
 5
 6
 7
 8
 9
10
11
12
13
14
15
16
17
18
19
20
|
package org.mykafka.springboot_kafka;

import org.springframework.context.annotation.Configuration;
import org.springframework.kafka.annotation.KafkaListener;

/**
 * @Author:懒大王Smile
 * @Date: 2024/5/13
 * @Time: 23:12
 * @Description:
 */

@Configuration
public class ConsumerController {

    @KafkaListener(topics = "first")
    public void consumerTopic(String msg){
        System.out.println("收到消息:"+msg);
    }
}
|
Spark 联动 kafka
尚硅谷 p73